What Is It Like To Climb Mount Rainier? Visiting Paradise & Ohanapecosh
Mount Rainier National Park is a stunning place to visit. It is an active volcano and at 14,411 feet tall is the 5th tallest mountain in the lower 48 states. We recently visited the park and spent a large portion of our time in the beautiful Paradise area of the park as well as surrounding sections.
Watch the video below to see why Paradise has truly earned its name and hear more about what it’s like to climb Mount Rainier! Then continue scrolling down to read more about the mountain, the climb, and the many things to do in this and nearby areas of the park.
DISCLAIMER: Never Stop Adventuring contains links to affiliate websites and is a member of the Amazon Services LLC Associates Program. When you click on and/or make a purchase through an affiliate link placed on our website, we may receive a small commission or other form of compensation at no additional cost to you. Please read our disclaimer for more info.
About Mount Rainier National Park

As an active volcano, Mount Rainier actually has a high probability of erupting again in the future. Other interesting facts are that it is the most heavily glaciated mountain in lower
48 states, with 25 named glaciers. The Puyallup tribe first called the mountain Tahoma or Tacoma. There’s actually a movement to restore the name to Tahoma, like what was done with Denali (Mt. McKinley) in Alaska. It became a National Park in 1899 and was our nation’s 5th national park.
There are 4 entrances to the park and 5 areas to visit:
- The Nisqually entrance in the southwest gives you access to the Longmire historic district and the Paradise area on the southern slopes of Mount Rainier.
- The Stevens Canyon entrance in the southeast gives you access to the Ohanapecosh area. This area is known for its ancient forests.
- The White River entrance in the northeast gives you access to the Sunrise area. This has amazing views of Mt. Rainier similar to Paradise, but from a different side. This is the highest you can drive up by car.
- The Carbon River entrance in the northwest gives you access to the Carbon River area. This area is more remote and thus one of the quietest areas of the park, with lakes and fire lookouts.
Paradise
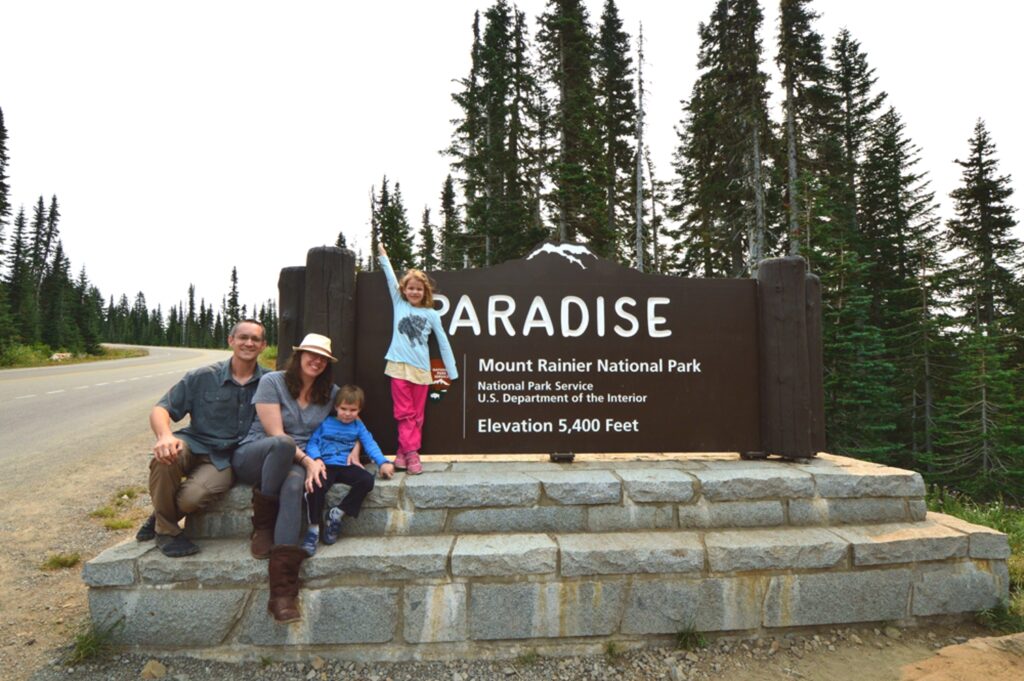
Paradise is one of the most pretty and popular areas of the park. Here you can go to the Henry M. Jackson Memorial Visitor Center as well as check out the historic Paradise Inn and Ranger Station. There are amazing views of Mount Rainier, wildflower meadows, waterfalls, and several hikes.
Skyline Trail
Once you’ve parked at Paradise, there are several trails that you can hike. We recommend the Skyline Trail, but others include the Alta Vista Trail and the Nisqually Vista Trail.
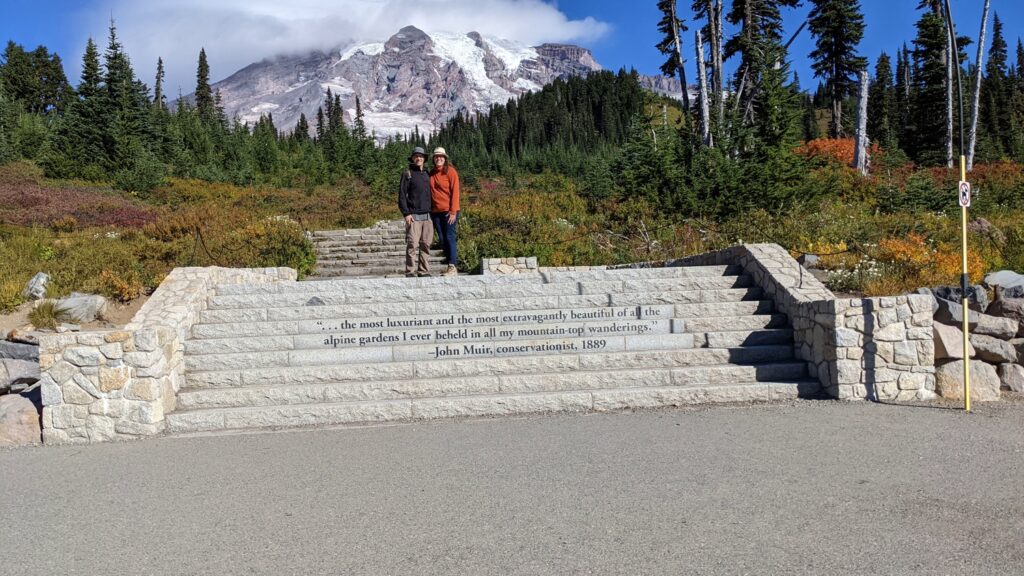
The start of the trail is near the visitor center. Head up the stone steps that are inscribed with a quote by John Muir. This is a great place for a picture.
“…the most luxuriant and the most extravagantly beautiful of all the alpine gardens I ever beheld in all my mountain-top wanderings.” -John Muir, conservationist, 1889
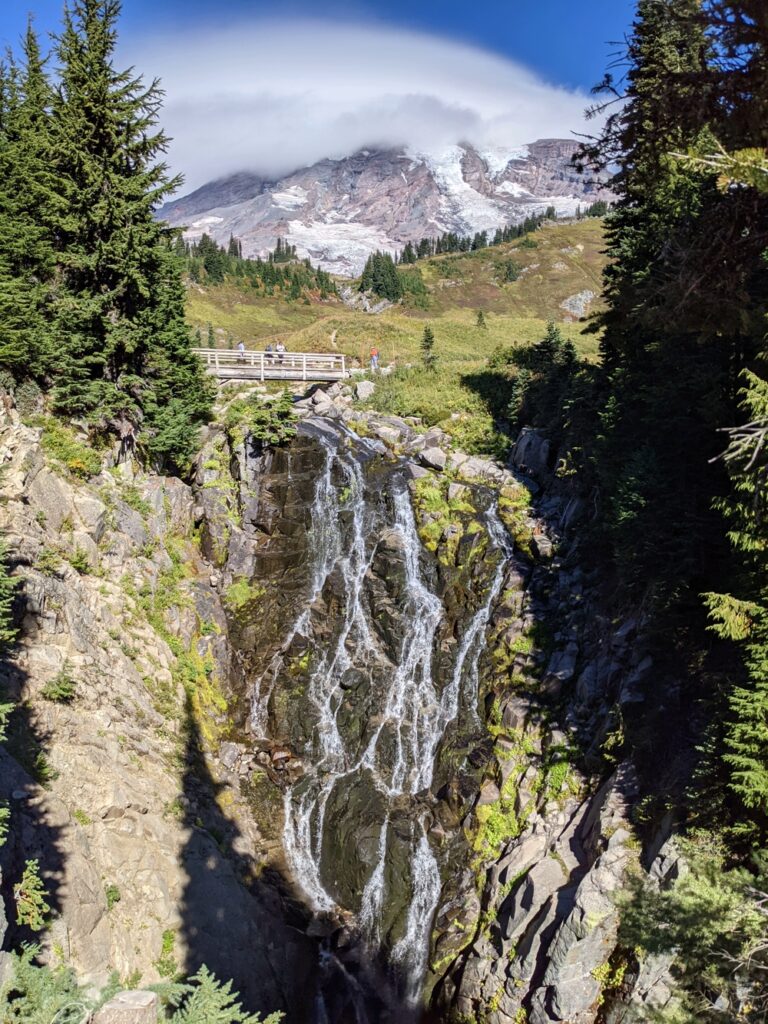
The Skyline Trail is a 5.5 mile loop. If you hike it clockwise, you’ll arrive at the stunning Panorama Point after 2 miles. You can then continue around the loop where another point of note is the beautiful Myrtle Falls and a stone bridge. You can also hike counterclockwise about half a mile just to Myrtle Falls and the bridge. This is what we did. There are excellent views on this portion of the trail as well.
Climbing Mount Rainier
In 2010, I (Christine) was fortunate enough to get the opportunity to climb Mount Rainier. Near the beginning of May Kevin and I got married. By the end of May I was flying to Seattle for this epic experience. Through my church in the northern VA area I got involved in a group called the Last Well. We raised money to support the cause of bringing safe drinking water to the nation of Liberia and the message of Jesus Christ, as well as trained to climb Mount Rainier as a way to raise awareness for that cause.
In our video about hiking at Paradise, I spoke about the trip, which still remains one of the most impactful, tough, and rewarding things I’ve been able to do in my life. I’m grateful to have been a part of it! I encourage you to watch the video linked above. We were able to add in footage of the actual climb from a video made by my climbing teammate Christopher Whytal so you can see what it was like! Christopher also does amazing photography and light painting that you can check out at https://www.instagram.com/christopherwhytal/.
Here is more about the Last Well, and a trip report about the climb!
The Last Well
The Last Well‘s mission is to provide safe, affordable drinking water to the entire nation of Liberia and preach the Message of Jesus Christ to those we serve. What’s so important about people having access to clean water, is that 1.1 billion people lack clean water. That’s 1 in 6 people. Preventable, water-related diseases kill nearly 14,000 people daily. And 1 child dies from lack of clean water every 16 seconds. That last one hits me especially hard as a mother now myself.
Amazingly, just this past year, I received an email that said that The Last Well and the Liberian people had accomplished what they set out to do in Liberia. How amazing is that?! I am so thankful imagining all of the people that now have access to safe drinking water. But The Last Well’s work isn’t over. They will now take what they’ve learned and apply it elsewhere around the world.
What Was It Like To Climb Mount Rainier?
We climbed with the guide service Alpine Ascents. We started at the Paradise Lodge at about 5000ft, hiking up across the Muir Snowfield, to Camp Muir at 10,000ft. After a training day, continuing 1,200ft higher to Ingram Flats, and from there on to the summit. Our guides were amazing and kept us all safe up and back. Here is the full trip report I wrote back then in 2010 if you’re interested in what a mountain climb is like!
The Full Trip Report
Pre-Climb Gear Check
We had our gear check with the guide service – Alpine Ascents – on Sunday, May 30, 2010. All of the gear I had neatly packed into my backpack was laid out on the floor for inspection. My items passed but I had already known I was going to have to rent several of the specialized items – ice axe, crampons, down peak jacket… They were extra critical of everyone’s gear due to the fact that they knew the weather conditions on the mountain were predicted to be extra harsh. Once repacked according to the guide service direction, my bag was organized totally different than I had attempted to do myself – but much more efficiently!
Our Guides & Heading To Mount Rainier
Monday, May 31 we got an early start, met our guides (Craig, Ian and Johnny), and were driven to the Paradise Lodge in Mt. Rainier National Park where we put on our gear, did some last minute pack adjustments, and hit the trail. Our fourth guide, Lee would meet us up at Camp Muir. We were wearing our double plastic boots (specialized mountaineering boots) immediately out of the lodge as we hit snow pack as soon as we stepped out of the parking lot.
Craig Van Hoy was our lead guide and he has quite the mountaineering record. He has done Rainier more than 350 times (at the 100 mark he was able to inscribe his name in a wooden beam in one of the Camp Muir huts that has now been preserved by the National Park Service), has made it to the top of all of the Seven Summits (the highest peak on each of the seven continents – this of course includes Everest), and numerous other mountains. He has even done “Paradise to Paradise” (from the lodge to the summit of Mt. Rainier and back to the lodge) in five hours. Whew! I knew we were in good hands.
Paradise To Camp Muir
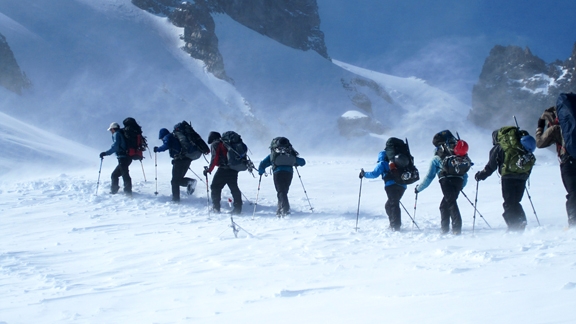
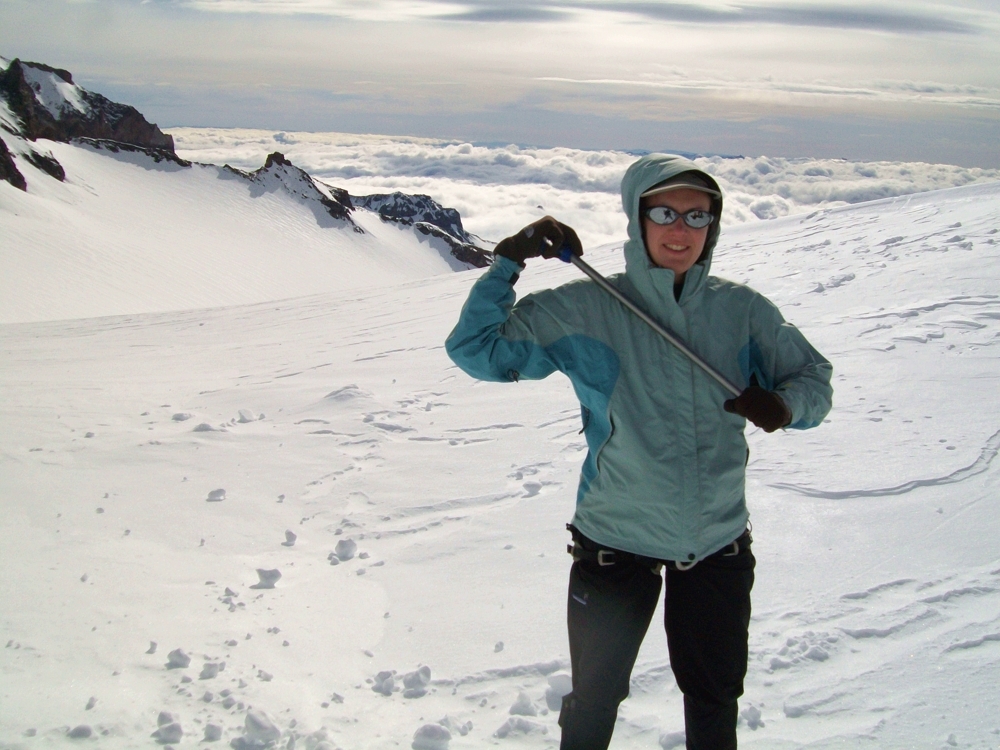
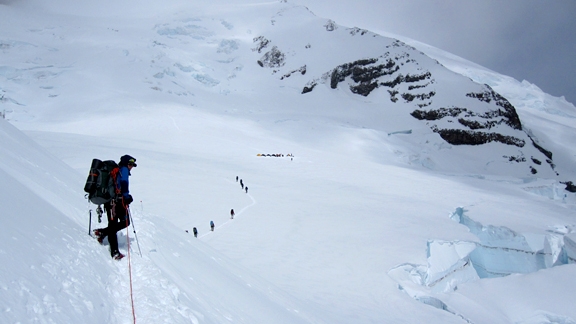
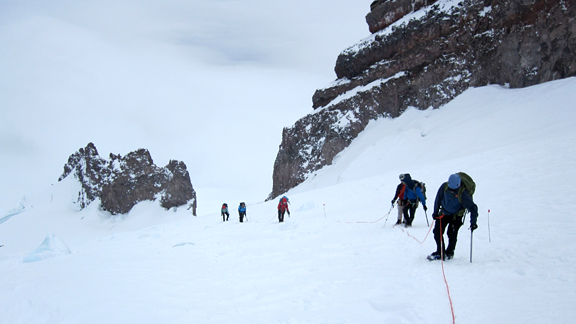
Our ascent consisted of our team walking in single file line up the mountain. In the photo, I’m in the light blue jacket with the red helmet on my pack. This day was more akin to hiking as we didn’t use our crampons yet and used our trekking poles rather than our ice axes. We wouldn’t be on the glacier until after Camp Muir. It was uphill all day – and after our first little break maybe 20 minutes out (you could still turn around and see the lodge) just to adjust clothing layers, we were already huffing and puffing.
The air was clear and cold and really invigorating. Although it was overcast and raining/snowing – the landscape was still beautiful: snow covered with rocks and cliffs jutting out here and there. We stopped every hour for a 10 minute break. This consisted of us dropping our packs, putting on an extra layer, sitting down, drinking and eating to refuel.
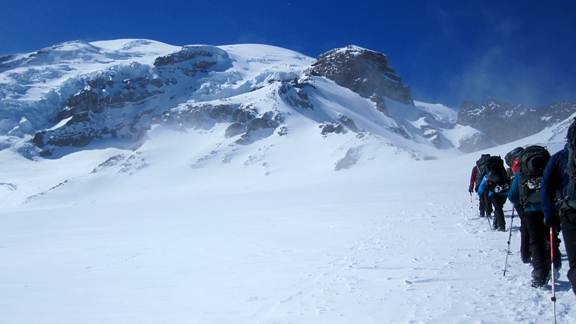
As we ascended over the Muir Snowfield the weather cleared and we saw blue sky and puffy white clouds – and there was also the summit far far above us! It was a breathtaking view and I think even put some more spring in our steps in anticipation of the rest of the climb. At that point we could also see the wooden huts of Camp Muir at 10,000 ft, except that for a long time they didn’t seem to be getting any closer! “Don’t look!” said the guides – just keep climbing. 🙂
Camp Muir
Dinner was served in the Alpine Ascents mess tent, and I personally think that the burritos our guides made tasted as good as any five-star restaurant. They say your appetite diminishes at altitude, but I didn’t notice it that night. By the very end of the trip I was not too interested in any of my snacks (and I can’t tell you when I think I’ll eat another Clif bar), but you make yourself eat for the energy. That night we slept on the wooden bunks in the hut and it was pretty comfortable.

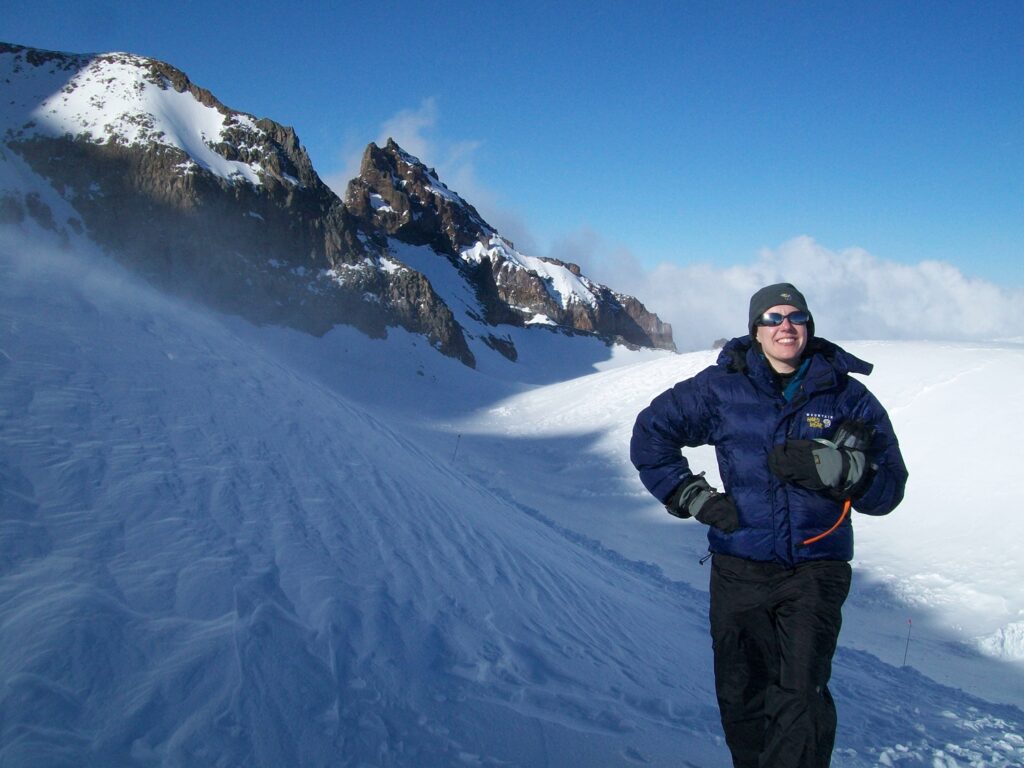
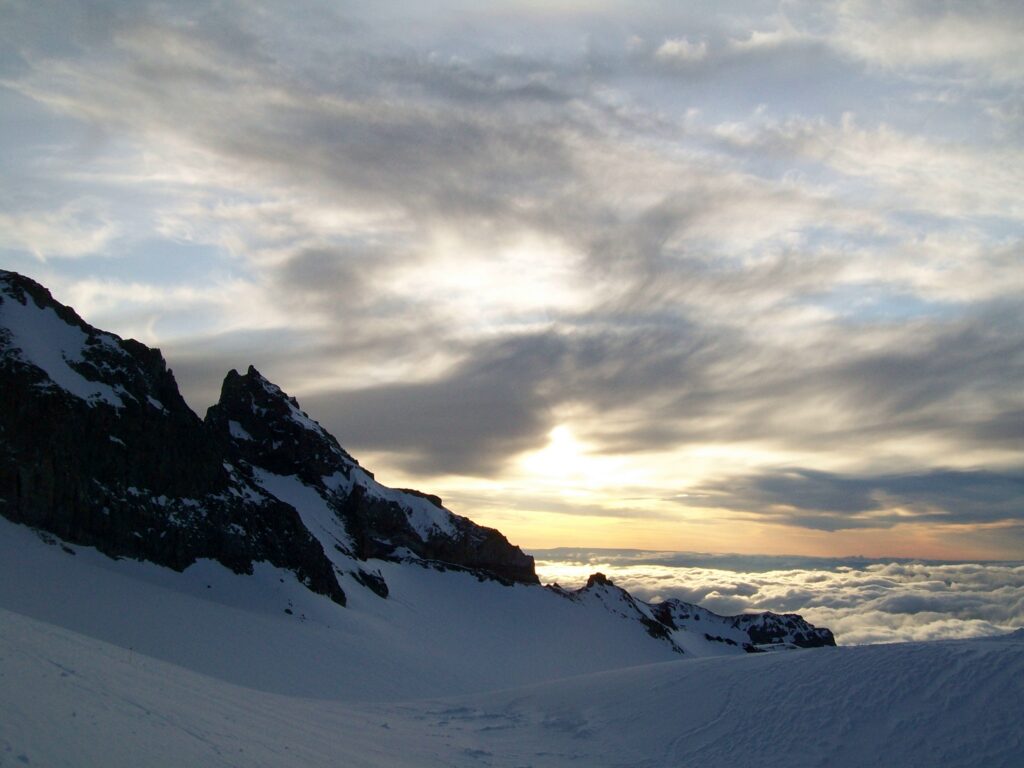
The views from Camp Muir were amazing. We were above the cloud line which is one of the views I was most looking forward to. Mt. Adams and Mt. St. Helens were visible in the distance.
Training Day & Climb to Ingram Flats
The next morning entailed a change in plans. On the way to the mountain we had asked our guides what they thought of going for the summit early due to the storm that was supposed to roll in the evening of the second day. This would be a change, since we were originally going to go for the summit early early morning of the third day.
They had been considering this and could have easily said we’d have to stick to the agenda but after reviewing the weather forecast and discussing the options amongst themselves our guides decided to have an abbreviated training session in order to make our summit attempt that afternoon. In training we learned how to hold and walk with the ice axe, how to properly self-arrest, using crampons, being roped up as a team, and all the various types of steps to use on different types of terrain (depending on steepness and direction of ascent or descent).
We then climbed 1,200 ft from Camp Muir up to high camp while roped up to each other in teams. At camp we rested for approximately 45 minutes and lightened our packs by leaving things we wouldn’t need during the summit bid in our tents. Then we took off for the summit.
Summit Bid
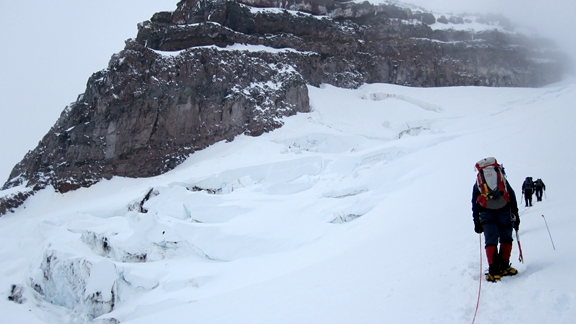
I was tied into the end of the rope on the last rope team headed for the summit. It was pretty amazing to see the team climbing ever higher and steeper up above me and then to turn around and see the high camp tents getting smaller and smaller. I could see a vibrant blue glacial lake far below. As we ascended we had to cross several crevasses – plant your ice axe on the other side and step over. They were each very narrow where we crossed but I could still look down and see the smooth icy blue curves going down into the depths.
The first leg of the summit bid was the longest so that we could push past the icefall region before resting. The next two legs of the summit would only be 900 ft of elevation each. This part of the ascent was like a steep and winding staircase. When we reached the second break – the last time we were scheduled to stop before the summit (900 ft of elevation from the top) – the guides made the call to turn us around due to the deteriorating weather conditions.
We really wanted to stand on that summit, and physically we could have all made it, but the guides made the right call. As Craig said, you have to also consider “the descent people, the descent – not just the ascent.” The lull we had been in had closed and the incoming storm was upon us so better to be safe than sorry. We then descended to high camp and spent the night in the tents with the wind howling around us.
The Descent To Camp Muir

The next morning we descended from high camp to Camp Muir in the worst conditions Craig had seen on the mountain in eight years. We were again roped up in teams but were repeatedly knocked to the ground by wind gusts of up to 70-90 mph. I would dig in my ice axe, get to my feet, and keep going. Visibility was low and scraping ice off of my goggles was almost a non-stop process. I kept thinking, uh oh Kevin lent me his goggles and asked me to be careful not to scratch them. I guess I owe him a new lens. 🙂
When we arrived at Camp Muir the entrance to the Alpine Ascents mess tent was almost entirely buried. Luckily the IMG tent was right next door and they graciously invited us in and gave us warm drinks while our guides dug out the door to our own tent.
Camp Muir Back To Paradise
The original plan had been that once we reached Camp Muir we’d have breakfast and spend only about an hour there before immediately continuing down the mountain. However, we actually ended up waiting until 2:00 pm before the guides made the call that we would descend. They had waited until our Team 2 reached the Muir Snowfield on their ascent to get their weather condition report as the weather on the snowfield can be distinctly different from that lower on the mountain. The report was good enough and add that to the fact that the huts were extremely crowded (I can’t even imagine how we all would have fit in addition to the other guided teams and the independent climbers already there) I think we were all ready to go down.
We passed Team 2 on the way down and briefly greeted them and encouraged them before continuing down. Although their weather on the way up to Muir was worse than ours they were also rewarded with a clear blue second day for their training. They were not able to go much higher than Camp Muir though due to the deep snow and another storm around the corner. The descent went fairly quickly and the best part was sitting and sliding down the steepest sections. Before I knew it we were already back at the lodge! The entire team wrapped up the trip with dinner at Wild Berry (a Nepalese restaurant) on the way home. This really was an amazing adventure. It challenged me and taught me so many new things.
Mount Rainier Waterfalls and Lakes
Mount Rainier National Park has several waterfalls that are worth checking out. They are easy stops on the scenic drive as you go through the park. In fact, on the day we attempted to hike at near the Paradise Lodge but couldn’t find any parking, visiting these waterfalls instead salvaged the day!
Narada Falls
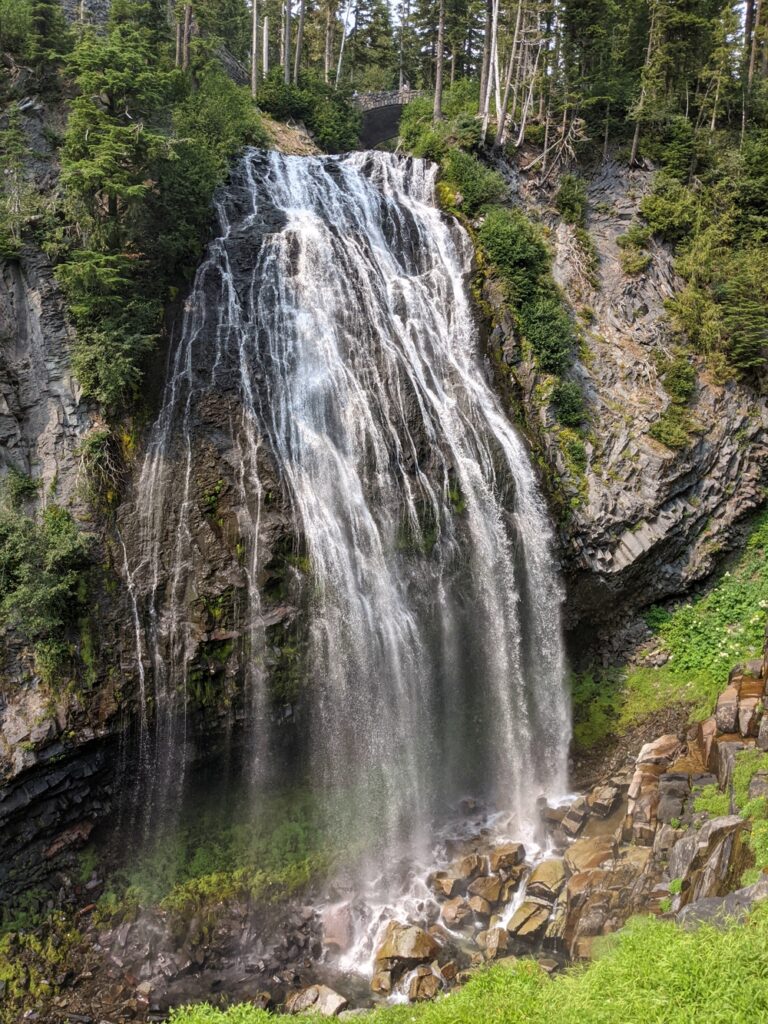
Narada Falls is a short distance from Paradise. You can see the top of the waterfall from a viewpoint right off of the parking lot. Or see it on the bridge over the river as it flows down over the edge. You can also take a short steep walk down to a viewpoint at the bottom. The trail is 0.2 miles round trip. We read that sometimes the trail can be wet and slippery, so be aware of that. However, when we visited it was completely dry.
The waterfall is 176 feet tall and has two portions. The upper “horsetail fall” is 159 feet tall. The lower portion that plunges another 17 feet to the bottom. The best view is definitely from the bottom if you can make the trek.
Christine Falls
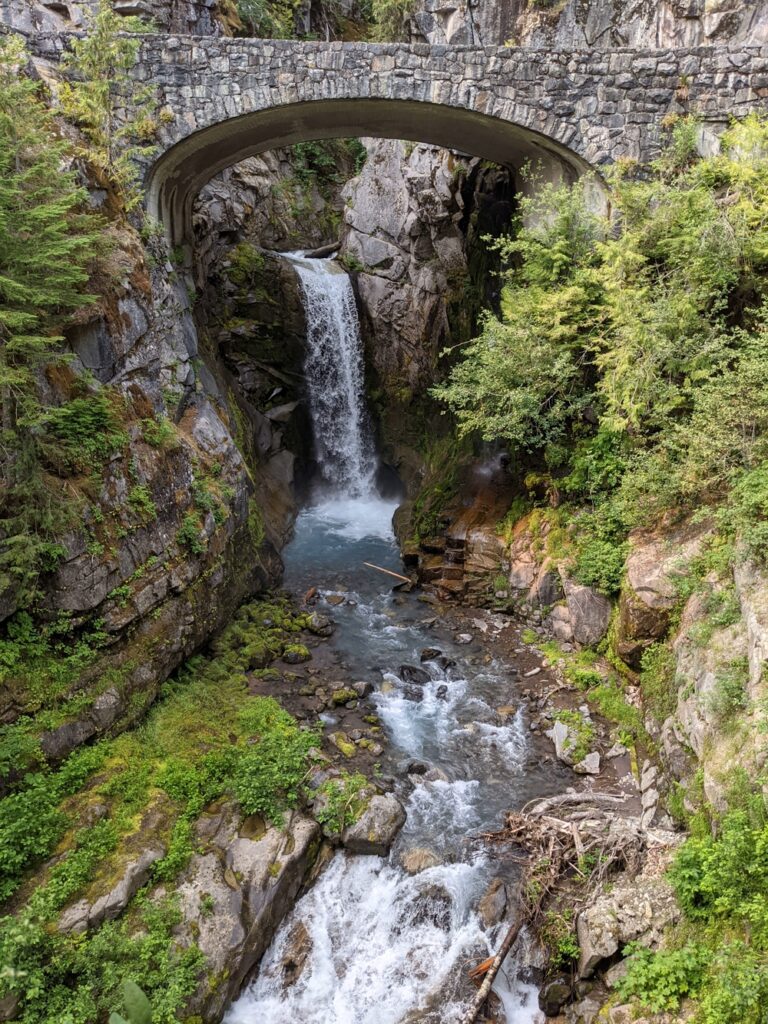
Christine Falls is another pretty waterfall that we recommend you stop and see. It is only a short walk from the parking lot. This waterfall is especially striking because it is beautifully framed by the stone bridge. The pool of water at the bottom is a bright blue. We thought it was especially neat since Christine is my name!
Reflection Lakes
Make a quick stop at the Reflection Lakes as well. It is a pretty view of the lakes on any day regardless. However, try to see it on clear day where Mt. Rainier isn’t obscured by clouds and when the water is still. Then you can see Mt. Rainier reflecting in the water. It’s a great place for a picture!
Ohanapecosh
The Ohanapecosh section lies in the southeast area of the park. It is known for its ancient forests but is not accessible in the winter. We highly recommend taking some time to drive over to this area as well.
Box Canyon
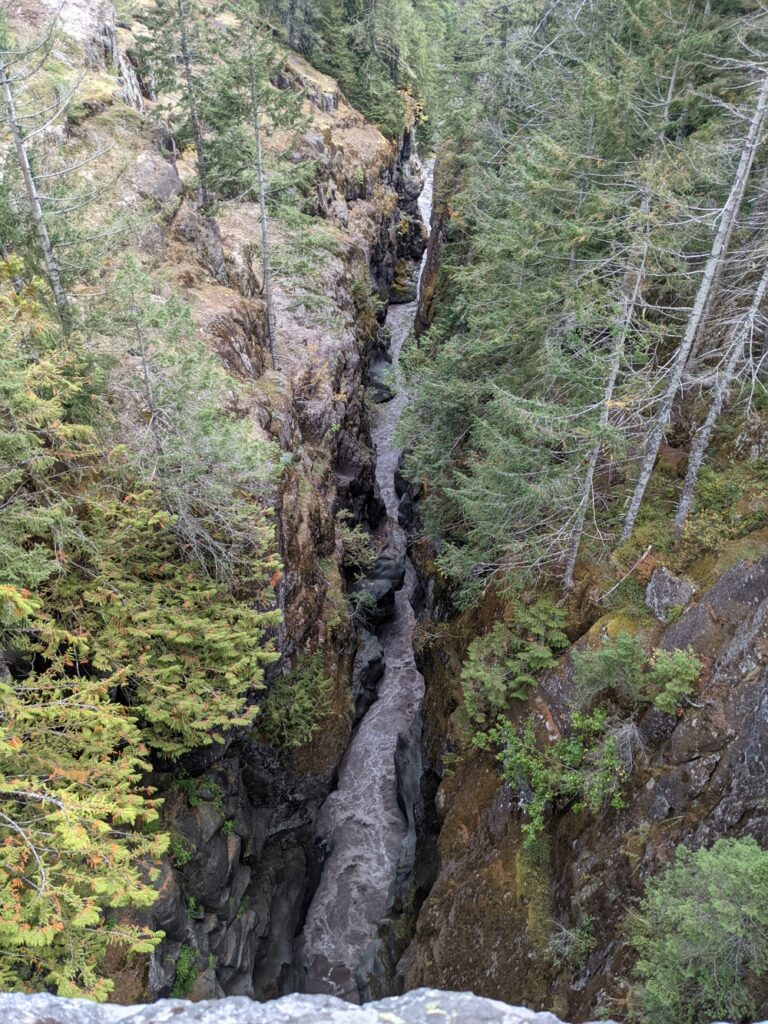
Box Canyon on Stevens Canyon Road can be a quick stop just for the overlook or a short hike. You’ll drive past it if you’re heading from Paradise over into Ohanapecosh. Box Canyon is a narrow and deep canyon with a river running through it which started as a crack in the granite bedrock. The overlook from the side of the canyon has some informative signs. You can walk on a slab of rock that is noted as having been glacier polished. The canyon is too narrow and steep to see the water from this angle. Head out onto the bridge to see down into Box Canyon and the water flowing through it.
If you want to see a bit more, you can take the 0.5 mile Box Canyon Trail along the edge of the slot canyon. It is a loop that will take you to a wooden bridge. Here you can also see down in to the canyon. There’s also the Box Canyon tunnel and the Box Canyon picnic area if you want to stop for a picnic.
Grove of the Patriarchs

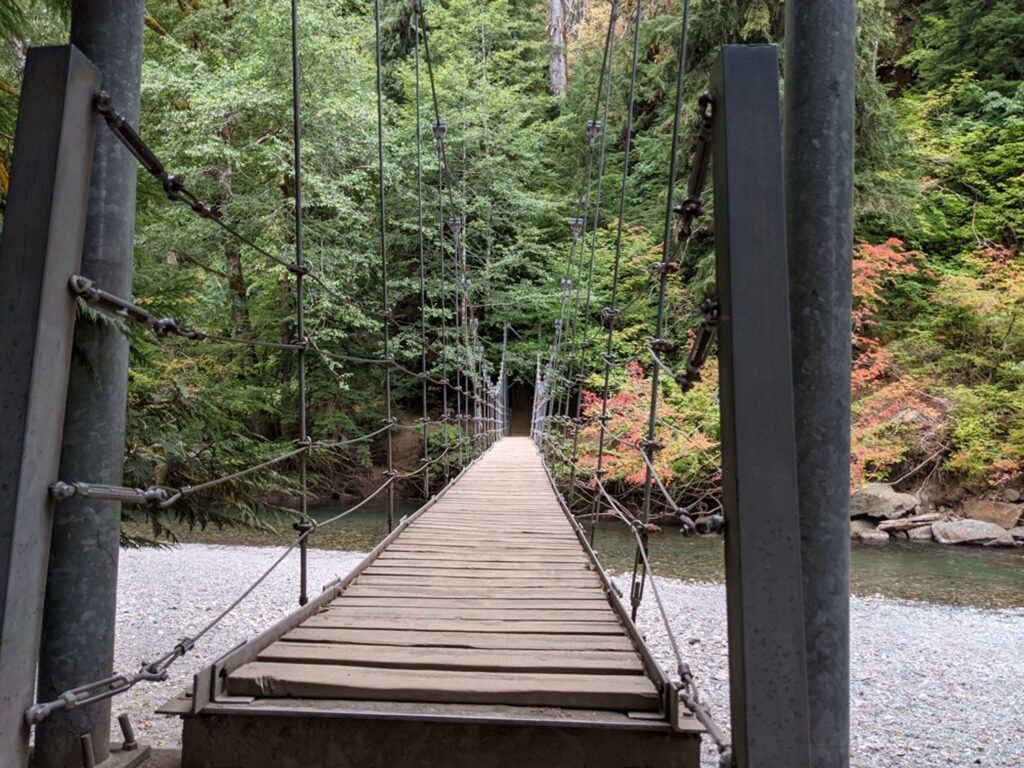
As you head a bit further away from Paradise on Stevens Canyon Road, you enter the Ohanapecosh area of Mount Rainier National Park. Here you will find a 1.5 mile trail to the Grove of the Patriarchs, some of the oldest and biggest trees in the park. There are ancient Douglas firs, western red cedars, and western hemlocks.
The hike is nice from the beginning and you will see plenty of big trees, but you definitely want to make it to the end where the actual Grove of the Patriarchs is. The trees in this area are even larger and more impressive. To reach the grove, you get to cross a really neat suspension bridge. You’ll then walk on boardwalks through the grove, to protect the root systems of the ancient trees. Though you may come to Mount Rainier National Park to see the mountain, don’t miss this trail!
If you visit Mount Rainier, spending some time in the popular Paradise area of the park and nearby areas such as Ohanapecosh is a must. Join us next time as we share why you should also check out the Sunrise area, and reach the highest accessible point of the park by car!
If you liked this post, would you share it with friends? Thank you!
You can check out some of our favorite gear and memberships on our Resources Page.
Pin For Later:

